Paving

Sealcoating Your Asphalt Pavement

Sealcoating is a crucial part of asphalt maintenance. It helps extend the life of your blacktop surface and enhances your property’s appearance.

Sealcoating

It is essential to understand how to properly prepare, mix, and apply a quality seal coat for maximum results. First, workers should wear adequate personal protective equipment.

Sealcoating is a process of applying a coating to the surface of asphalt to protect it from damage and make it look newer. It helps to protect the pavement from the elements, chemicals, and oil spills that degrade the asphalt. It is important to apply a new layer of sealcoat every few years to keep the pavement looking good and functioning properly.

Before you can apply the sealcoat, it is essential to clean the pavement. This should include removing any weeds, grease, or oil spots from the asphalt. You can do this with a power washer or by hand using a stiff brush. In addition, the area should be completely dry before applying the sealcoat. This will ensure the quality of the work and help the sealcoat to stick.

If you are sealing your commercial parking lot, it is a good idea to communicate with customers and business partners about the site being inaccessible for several hours while the sealcoat dries. This will ensure that nothing is disrupted during the process and that the sealcoat has a chance to fully cure before vehicles are allowed back on the site.

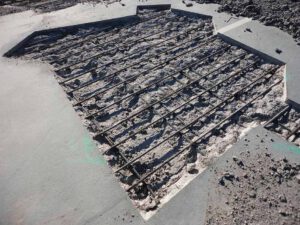
In addition, you should assess the area to determine if it needs any repairs before proceeding with sealcoating. This may include repairing cracks, filling potholes, and replacing severely damaged areas of the pavement. It is also a good time to repair any catch basins, drainage grates, or drain tiles that are damaged.

After the repairs are made, the blacktop should be thoroughly cleaned with a broom or air broom to remove any dirt and debris that is left on the pavement. This will ensure that the sealcoat adheres well to the blacktop and that it looks clean once it is dry.

It is also a good idea to remove any signage from the pavement, as this will prevent it from being covered by the sealcoat. Additionally, you should close off the area to pedestrians and vehicles so that they are not in the way of the process. This can be done with cones and barricades if necessary.

Mixing

Sealcoating is a protective coating that preserves asphalt pavement by shielding it from the sun’s damaging UV rays, slowing down the oxidation process, and protecting it from chemical penetration. It also provides a skid-resistant and anti-glare surface for vehicles. Sealcoating is a great way to extend the life of asphalt, and it’s relatively inexpensive. It’s a good idea to get it done every two to three years.

Before you apply the sealcoat, it’s important to make sure that the surface is clean and dry. This will prevent the new coating from sticking. In addition, you’ll need to remove any oil spills, debris or dirt that may be present. You can use a broom, power washer or hose to clean the surface. Once the area is dry, you can start to mix the sealcoat.

It’s important to follow the manufacturer’s instructions when mixing sealcoat. The sand, additives and water should all be mixed in the recommended proportions. The mixer should be agitated for 5 to 10 minutes after all the ingredients have been added. The sand should be of the right grade and consistency to ensure that it will bond well with the asphalt.

There are several different types of additives that can be used in a sealcoat mix. Some are designed to help the material dry faster, while others modify sand suspension or add resistance to salts and petrochemicals. The best type of additive for your needs will depend on the conditions in your area and the specifics of your project.

Another important consideration is the temperature. You’ll want to apply the sealcoat in warm weather so that it will have a chance to cure properly. It’s a good idea to avoid applying sealcoat when it is expected to drop below 50 degrees or when rain is in the forecast.

If you need to apply sealcoat in colder weather, it’s a good idea to apply multiple coats. This will allow the sealcoat to set more quickly, and it’ll be less likely to damage the surface. This will also prolong the life of your sealcoat.

Applying

The purpose of sealcoating is to fill in cracks and chips, slow down the oxidization of asphalt and provide a barrier against harsh weather conditions, chemicals, water, oils, vehicular harm, and U.V. rays. It is a protective layer that, when applied regularly to an asphalt pavement surface, extends its life and appearance significantly.

The sealcoat is composed of a thick liquid mixture containing various additives to enhance its performance. These additives may help in drying the sealcoat, altering sand suspension, increasing water repellency, improving flexibility, and adding resistance to salts and petrochemicals. The main ingredient is a refined coal tar, derived from the distillation of bituminous coal. It is mixed with sand and other fillers to create a material that is easy to apply, stores and handles.

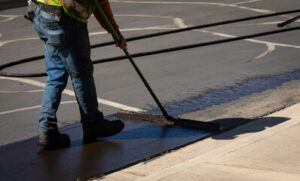
There are several methods of applying the sealant, but spraying is by far the most common and preferred method. A sealcoating trailer or skid-mounted spray system is used with a hand wand or distributor bar to evenly apply the sealer over the asphalt surface. Spraying is faster than squeegee application and gives a smoother, more uniform finish.

It’s important that the asphalt be clean and dry before sealing. It should be broom swept or power washed to remove loose dirt, sand, debris and other contaminants that would interfere with the bonding of the sealant to the pavement surface. It’s also necessary to ensure that all vehicles and pedestrian traffic are kept off of the sealed area until it dries completely, usually 24 hours.

If rain is expected shortly after the sealant is applied, it will need to be allowed to dry again. It’s important that people keep off the driveway until then because any movement will cause the sealant to be dislodged and leave uneven marks on the pavement.

Once the surface is dry, a second coat of sealant is typically applied with the same process as the first. This helps to keep water out, improves the look of the surface and prolongs the life of the driveway or parking lot for an additional 5-10 years.

Curing

Sealcoating is a water based coating derived from refined coal tar or asphalt emulsion. It’s safe, easy to handle and store and provides years of projection to paved surfaces when applied properly and allowed to fully cure. Proper curing conditions for sealcoating are influenced by ambient and surface temperature, relative humidity and wind velocity. Sealcoatings that are cured under poor conditions are prone to premature failure such as peeling and/or failure to provide proper water, oil and chemical resistance.

A properly cured sealcoating is free of voids and imperfections that prevent the binding agents from fusing together to form a tough, durable film that protects the asphalt pavement underneath it. The bonding agents, fillers and aggregates of a sealcoating are all designed to work together to produce a protective barrier against water, oils, fuel, chemicals and road salts from penetrating the asphalt pavement and degrading it.

The curing of a sealcoating is a multi-step process that takes time to complete. It takes a minimum of three hours for a sealcoated surface to be ready to walk on and 24 hours for a surface to be ready to drive on. This curing process is accelerated by warmer temperatures and reduced humidity. It’s best to schedule your sealcoating project from spring through fall when the weather is most favorable for this process.

When a paved surface is freshly sealed, it will be somewhat glossy but it will dry to a smooth matte finish. During this process, there may be some light scuff marks that will need to be buffed off in order to achieve a smooth, uniform appearance.

Humidity is the major factor in determining how long it will take for a sealcoated surface to completely dry and cure. When the humidity is high, the moisture in the sealcoating is unable to evaporate as quickly as it would in lower humidity conditions. For this reason, it’s important to schedule a day for sealcoating when the forecast calls for clear weather with no chance of rain. This will ensure that the sealcoating has plenty of time to dry and cure before it’s exposed to traffic.

Body Care

Laser Hair Removal For Bikini Areas

Women who want to avoid the irritated skin, ingrown hairs, and razor bumps associated with shaving or waxing should consider laser hair removal. This is one of the most permanent forms of hair reduction available.

Laser Hair Removal

The bikini line, labia, and perianal area suit this treatment. Unlike shaving or waxing, laser destroys the hair follicle so that hair can no longer grow back.

The bikini area is a popular target for unwanted hair. This is especially true in the summer, when women are wearing shorts and swimwear more often. For many, shaving the area is a chore that can result in painful razor bumps and ingrown hairs. Waxing is another option, but it can be time-consuming and expensive. If you’re looking for a more permanent solution to this problem, laser hair removal is an excellent choice. This treatment can eliminate the need for shaving, waxing, and plucking.

The best results are achieved with a full course of laser hair removal, typically six sessions. This will reduce the amount of hair growth and prevent it from returning. The first couple of sessions may be slightly uncomfortable as the melanin in the hair is targeted by the laser, but these sensations subside over time. The area is also sensitive immediately after the treatment and some people experience swelling or itchiness. These symptoms can be helped by applying some soothing Aloe Vera gel to the area as needed.

If you’re interested in having your hair removed from the bikini area permanently, it’s a good idea to discuss the different options available with a qualified practitioner. They will be able to advise you on which style is right for you. The most common options are the Brazilian and Hollywood styles, which both remove the majority of hair from the area.

During the laser treatment, you’ll wear goggles to protect your eyes from the laser light. The laser technician will then move the handheld device over the chosen area, where a small zap of energy is applied to each hair follicle. The laser device then returns to the original position and repeats this process. This is done on each section of the bikini area until all the hair has been removed or the desired level of hair reduction is achieved.

One of the biggest advantages of laser hair removal is that it can help to prevent future growth by targeting the melanin in the hair follicle and disabling it. This is especially effective on darker hair, as it is easier for the melanin to be targeted by the laser. Lighter hair, like blond or red hair, can be more difficult to treat with laser hair removal.

Before getting laser treatment, it’s important to avoid waxing or plucking the area in the weeks leading up to your appointment. This is because laser targets the hair at its root, and removing the hair before this can affect the success of the treatment. It’s also a good idea to steer clear of sun exposure and tanning beds for the same reason.

Preparation

There’s nothing better than smooth, hair-free skin, especially during swimsuit season. But shaving and waxing are not only time-consuming, they also produce short-term results that leave you with painful razor bumps and ingrown hairs. The good news is that there’s a long-lasting, permanent way to remove unwanted hair in the bikini area – laser hair removal.

Unlike traditional methods, laser hair removal for the bikini line targets each individual hair follicle, damaging it and inhibiting future growth. This means that after a series of treatments, your desired level of hair reduction can be achieved – without the pain and irritation.

Before your treatment, you should avoid waxing or plucking the area, as this can interfere with the laser’s ability to target the hair follicle. However, you can continue to shave the area if you wish. You should also avoid sun exposure or sunless tanning in the days leading up to your appointment, as this can cause discoloration in the area that will affect the outcome of your treatment.

On the day of your appointment, it is important to dress comfortably in loose-fitting clothing. This will help keep the area calm and comfortable after the treatment. You should also avoid scented products or perfumes in the area, as these can irritate your skin. Finally, be sure to skip any creams or makeup on the day of your appointment – these can interfere with the effectiveness of the laser.

Laser Hair Removal is a fast and effective method for removing hair in the bikini area. The laser’s precise targeting allows it to remove hair that is typically missed with shaving and waxing. The laser’s energy also helps to prevent ingrown hairs that are caused by manual methods.

There are different types of Laser Hair Removal available for the bikini area, including the Brazilian and Hollywood. The difference between these two styles is that the Brazilian eliminates all hair in the pubic area, while the Hollywood removes most of the hair on the tops of the thighs, front of the labia and the outer area of the bum.

Treatment

During treatment, the laser’s light energy is absorbed by the pigment or color in the hair follicle, which damages the follicle and prevents it from growing new hair. This is permanent. However, it is not for everyone. Blond, white or grey hair does not have the melanin needed to work with a laser and will not respond. Certain skin disorders such as lupus, cancer or a history of sunburn are also not suitable for treatment.

The treatment is painless, but it may feel like a flick from a rubber band. A topical numbing cream can be applied before treatment for additional comfort, but this is not always necessary. Before the treatment starts, a patch test will be performed to ensure that your skin will not react negatively to the laser. This is an important step to take before beginning any treatment as it is possible that the skin will react to the laser, and this can be extremely painful.

Once your skin is prepared, the laser is used on the area of unwanted hair and will remove most or all of it with each session. The treated hairs will not grow back and the remaining hairs will be finer and softer. Depending on your skin type and hair color, you will likely need six to 12 sessions to achieve your desired results.

Compared to waxing, laser hair removal is much less painful and a lot more convenient. No more ingrown hairs or razor burn and no need to shave the area thrice a week. It is also a much longer-lasting solution and will save you hundreds of dollars in the long run.

After a full course of laser hair removal, your bikini line will be virtually hair-free. However, as hair regrowth is based on hormones, regular top up sessions are required to maintain your reduction.

My Blog

Concrete Services – How To Choose The Right One For Your Needs

There are many options when it comes to repairing your concrete. You can choose to repair a crack or use a new piece of concrete. It is important to choose the right kind of material for the job. You can purchase materials from a materials supplier or DIY stores. However, you should know that there are a few factors that you need to consider before deciding on a specific type of concrete repair. Concrete Repair professionals will help you determine the best possible options for your needs. 

concrete

Determine the extent of delamination – a large slab will require full-depth repair. In this method, the damaged concrete must be removed and replaced with a fresh one. You can use a partial-depth repair to fix a smaller portion of the problem. The remaining concrete can be cleaned and left outside for weeks before determining the final color. You must remember to check for signs of leakages before starting this type of repair.

Preparation is vital for successful concrete repair. The first step in the process is removing the crumbling areas. A heavy-duty trowel can remove small areas, but larger areas will need a sledge and a cold chisel to get the job done. Once the area has been cleaned, it should be vacuumed or hosed down to a solid base. If the crack is too big, a breaker is needed.

Choosing the right concrete repair is essential. There are different types of repairs available for different needs. For example, you can choose colored concrete for a patio or walkway. You will need to take care to match the color of the old concrete and the new one. A new patch of concrete will look like a brand new piece of material, but you will have to pay close attention to detail. If you’re unsure about the best method of repair for your specific needs, you can consult a professional for guidance.

The first step in concrete repair is to prepare the area. If there are crumbling areas, you should remove them first. You can use a heavy-duty trowel to remove small sections of concrete. If the crack is bigger, you can use a cold chisel to remove larger pieces of concrete. Then, hose the area down to a solid base. It is important to remember that when it comes to the size of the repair, the more it is, the better.

After removing the damaged concrete, you should prepare the area properly. Before you begin the repair, make sure to remove the areas that are crumbling. Using a heavy-duty trowel, scrape the surface and remove loose edges. Clean the area thoroughly and hose it down. If you’re repairing a large area, you should also consider using a more aggressive technique. If you’re working on a small area, use light-colored paint to paint the entire area.

In most cases, a repair product is made of chemicals that cause a crack. These chemicals are not good for the environment and can be dangerous to the environment. In addition, they can cause a lot of problems for the area that they have been placed in. If you’re preparing the floor, make sure to use a good primer to keep the area clean. Then, you’ll be ready for the next step. If you’re working on the slab, you’ll need to use a thick layer of cement.

After preparing the surface, you’ll need to repair the concrete that’s deteriorating. It’s very important to clean it thoroughly so that the repair will be successful. Ideally, the repair should be a seamless part of the existing concrete. You should use a strong adhesive to prevent shrinkage after the repair. Once you’ve completed the preparation, the new concrete will be bonded to the existing one. But this may be a challenge for the DIY-er.

A repair should be done as soon as possible after noticing a concrete defect. The goal is to reduce the differential shrinkage between the repaired and original concrete. Once it’s finished, the repaired area should be as close to the original as possible, so that it doesn’t look like a repair. It should become a permanent part of the product. Ensure it doesn’t have cracks or delaminations. Then, it should be thoroughly cleaned and moistened.